You are viewing an old version of this page. View the current version.

Compare with Current View Page History

« Previous Version 14 Next »

The information on this page only applies to version 6.1 of the Reporting Software Options and related documentation.  See this page for other versions of the documentation.  The version number of the PRL software you are using can be found on the Help menu under the About item.


There are two ways to validate your report files, by the file or by the folder.

Only text files whose names start with one of the recognized prefix letters (P, A, M, or S) are checked. See Report File Naming for details about file naming conventions.  If you are validating one file at a time and you choose a file with an invalid initial letter, it will fail validation.


To Validate a Single File

  1. Select one of the form types in the Report Forms frame.

  2. Select the Validate File button (or the menu item Validate –> File).

  3. You will be prompted with a standard Windows dialog box to select a file from the report folder to validate.

    The list of files displayed is filtered to show only those with the correct initial letter (see Report File Naming).

  4. Either pick the file you want to validate or navigate to the folder containing the file you want and select the Open button.
    1. For larger files a dialog with a progress bar and an estimate of the time remaining for the validation run will display.  This dialog also contains a Stop button.

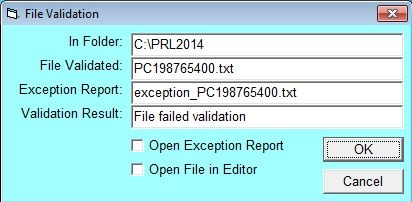
  5. When file validation is finished, you will see a message box telling you whether or not the file passed validation and some other information.

  6. If the file did not pass, you have the option to open the exception report. Regardless of the outcome, you can open the file in the editor where any cells with validation errors will display with a pink background.  If there are errors, a small dialog will show the number of errors before the editor opens.


To Validate a Report Folder

You may validate all of the PRL report files in a single folder in a single operation, instead of selecting each file individually.

  1. Select the menu item Validate –> Folder.

  2. You are asked whether you saved your files in the current report folder. If you answer Yes, the program proceeds with validation. If you answer No, you are shown a dialog box to select the folder that contains the report files.

  3. When validation is finished, a message box informs you:

    1. How many files were checked.
    2. How many of those files passed validation.
    3. How many files had warnings.
    4. How many files failed validation.

  4. Exception reports are created for any files with either Warnings or Errors.

Keystroke Shortcuts
  • Validate File: Alt-V, F or Alt-V
  • Validate Folder: Alt-V, D


  • No labels